2. In a Command prompt go to the directory docker-spring-boot and issue the command $ mvn clean package
You can see a jar file named docker-spring-boot.jar is created under the docker-spring-boot/target directory.
Creating Docker Image:
3. Make sure the Docker is running in your local, if not start the Docker by issuing the following command $ sudo systemctl start docker
You can verify if Docker is running by issuing the command $ sudo systemctl status docker
4. Create a temp Directory in a location of your choice and copy the jar docker-spring-boot.jar (created in Step 2) to that directory
5. Create a file called Dockerfile (with no extension) in the same directory and copy the following content to it
FROM openjdk:8-jre MAINTAINER Balamurugan Tamilmani VOLUME /tmp ADD docker-spring-boot.jar app.jar RUN sh -c 'touch /app.jar' ENV JAVA_OPTS="" ENTRYPOINT [ "sh", "-c", "java $JAVA_OPTS -Djava.security.egd=file:/dev/./urandom -jar /app.jar" ]
You can replace your name as MAINTAINER
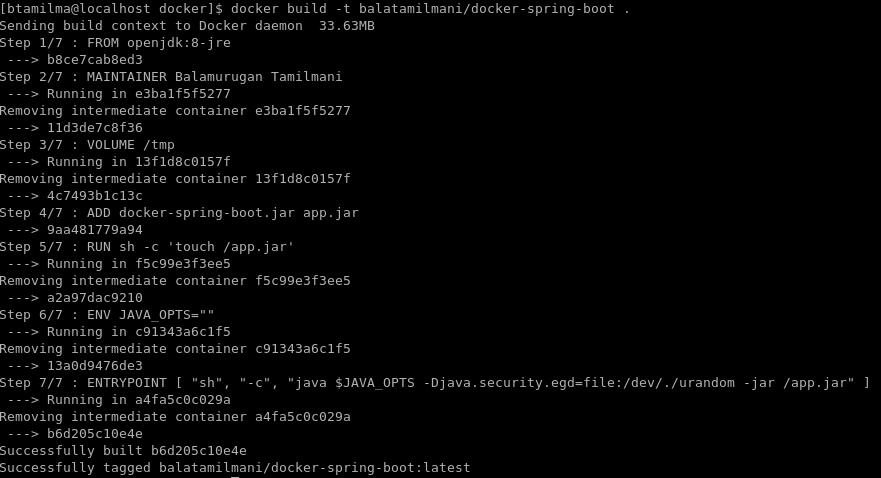
6. Issue the following command from the same directory to create the Container Image $ docker build -t balatamilmani/docker-spring-boot -f Dockerfile .
In the place of balatamilmani substitute your name. This will produce the following output
7. Issue the Docker image list command to see the image is created and stored
$ docker images
Running the Image in Docker Container:
9. Issue the following command to run the Image in the Docker Container $ docker run -it --rm -p 8181:8080 balatamilmani/docker-spring-boot
Options:
it - Interactive
rm - Remove the Container on exit
p - Bind the container port 8080 to host port 8181
On issuing this command you can see the Spring Boot application startup logs
10. Open a browser window and go to the URL http://localhost:8181
You should be able to see the response from the application as given in the image
11. To start a new Container with the same image issue the same command binding different Host port (e.g. 8282) to the Container port 8080 $ docker run -it --rm -p 8282:8080 balatamilmani/docker-spring-boot
12. Now you can verify the application is running in the URL http://localhost:8282
13. The following command will list the list of running Docker Containers
$ docker ps
14. To stop a Container issue
$ docker stop <CONTAINER ID>
15. To remove the Docker Image from local repository
$ docker image rm b6d205c10e4e
Where <b6d205c10e4e> is IMAGE ID of the Image
In this post we will see how to connect to GitHub using SSH Keys.
Environment & Tools
Unix (Fedora 25)
Spring Tool Suite 3.9.1
1. Create a folder to save the SSH Keys (e.g. /home/bala/keys)
2. Execute the following command on this folder, enter a passphrase (e.g. MyHardPassword) when asked ssh-keygen
-t rsa -b 4096 -f ./id_rsa -C "your-email@gmail.com"
where
-t
-> Name of the Algorithm (e.g. rsa, ecdsa)
-b
-> Key size (e.g. 2048, 4096)
-f
-> File Name where the Private key is stored (public key will be
stroed in id_rsa.pub file)
On issuing "ls" command you can see two files id_rsa & id_rsa.pub
3. Now log into your GitHub account and click on "Settings"
4. Choose "SSH and GPG Keys"
5. Click on "New SSH Key"
6. Give a name such as "bala-key"
7. Copy the content of the file "id_rsa.pub", generated in Step 2, and paste it
8. Once the key is saved, it would look like this
9. Create a new Repository such as "ssh-code-checkin-test"
10. Copy the SSH repository URL
11. On the command prompt issue the following command to clone the repository, note the command includes the Private key file "id_rsa" and Repository URL GIT_SSH_COMMAND='ssh -i id_rsa' git clone git@github.com:balatamilmani/ssh-code-checkin-test.git
12.Open STS Preferences and search "SSH", on the General Tab specify directory name where the keys are stored (i.e. /home/bala/keys). On "Private keys" field mention the private key file (i.e. id_rsa which is in the same directory)
13. Create a new Project and configure it in Spring Tool Suite
14. Right click on Project and choose "Team->Add to Index", now open GIT Perspective
15. Enter a Commit Message and check in the files, if prompted provide the Passphrase (MyHardPassword) which you provided in Step 2
16. The checked in code will be in the GitHub now
Note: The same way we can configure the SSH Keys for the BitBucket as well.
In this Tutorial let us see how to use Apache's JMeter to test the RESTful WebServices we developed in my previous post RESTful-web-service-with-spring-3x
1. Download JMeter Click here to download
2. This version requires Java 6 or later
3. Create a Thread Group and give a name, e.g "RestServiceTestingGroup"
4. Set "Number of Threads (Users)" to 5
5. Set "Ramp-up period (in seconds) to 1
6. Set "Loop Count" to 2
7. Right Click on RestServiceTestingGroup and choose Add->Sampler->HTTP Request
8. Give "getStockInformation" as Name
9. Set "localhost" in the "Server Name or IP" field
10. Give 8080 as "Port Number" value
11. Set "http" as Protocol
12. Choose "Post" as Method
13. Type "stock-service-war/stockService/getStockInformation" in the "Path" field
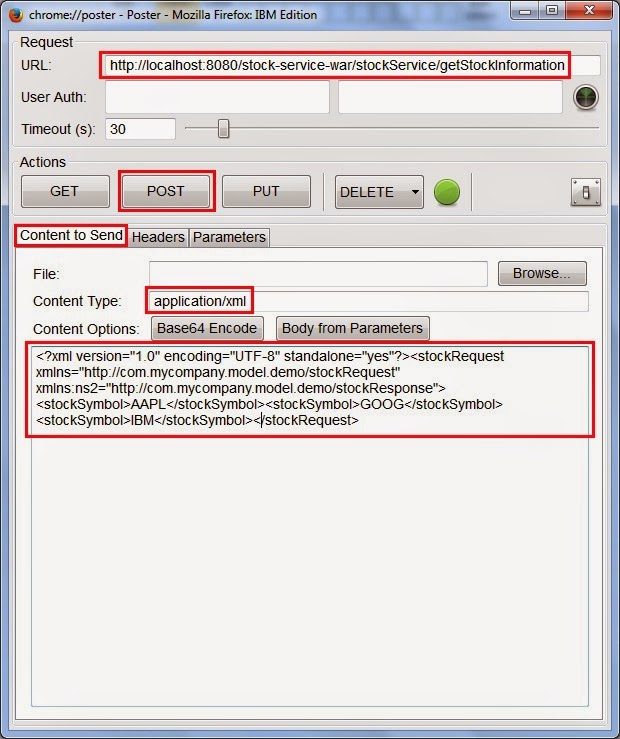
14. Open the "Body Data" Tab and paste the following XML <?xml version="1.0" encoding="UTF-8" standalone="yes"?><stockRequest xmlns="http://com.mycompany.model.demo/stockRequest" xmlns:ns2="http://com.mycompany.model.demo/stockResponse"><stockSymbol>AAPL</stockSymbol><stockSymbol>GOOG</stockSymbol><stockSymbol>IBM</stockSymbol></stockRequest>
15. Right Click on RestServiceTestingGroup and choose Add->Listener->View Results Tree
16. Type "stockInfoServiceResult" in the Name field
17. Right Click on RestServiceTestingGroup and choose Add->Config Element->HTTP Header Manager
18. Leave the Name field as it's, if you want you can give a name
19. Clikc on "Add" button at the bottom
20. Type "Content-Type" in the "Name" field and "application/xml" in the Value field
21. Right Click on RestServiceTestingGroup and choose Add->Listener->View Results in Table
22. Now Click on "Start" button
23. To see the Request/Response Click on the "stockInfoServiceResult" on the Left navigation, click on the "getStockInformation" on the Right side panel and open "Request" & "Response" Tabs on the Right side
24. To see Timing statistics click on the "View Results in Table" on the Left navigation bar, this View shows How many times the service is invoked, What is the time taken for each service call, What is the average time of service call etc..
25. To get the JSON response from the Service choose "HTTP Header Manager" on the Left panel, Click the "Add" button on the bottom right side, Type "accept", "applicatoin/json" respectively in the Name and Value fields
26. Now hit the "Start" button, you can clear the existing results by clicking on "Clear" & "Clear All" buttons on the Tool Bar. The "stockInfoServiceResult" shows the JSON Response
In this Article let us see how to develop a RESTful Web Service with Spring 3.x
Tools I used:
Eclipse 4.4 (Luna)
jdk1.7.0_45
apache-maven-3.2.1
apache-tomcat-7.0.47
The requirement:
Write a Restful Webservice which accepts a list of Stock symbols and return the following for each of them
1. Stock Name
2. High Price
3. Low Price
4. Closing Price
5. Volume
6. Change in Price
6. Change in Percentage
Step 1:
1.1 Create a Java Project using the Maven command given below. This is where we are going to define the XSDs for input and output of the Service. mvn archetype:generate -DgroupId=com.mycompany.model.demo -DartifactId=stock-model-jar -DarchetypeArtifactId=maven-archetype-quickstart -DinteractiveMode=false
1.2 Switch to the folder stock-model-jar and run "mvn clean install" followed by "mvn eclipse:eclipse"
1.3 Import the Project stock-model-jar into Eclipse Workspace
1.4 Create a folder called xsd under src/main
1.5 Create two XSDs viz stockRequest.xsd & stockResponse.xsd
1.6 Add the following in the pom.xml
1.7 Execute the commands "mvn clean install", this generates Annotated Jaxb classes. The generated classes could be found under <your-workspace>\stock-model-jar\target\generated-sources\jaxb\com\mycompany\model\demo\oxm. The classes also bundled in the jar file.
Step 2: Setting up the Spring MVC Web Application
2.1 Create a Maven Web application project called "stock-service-war" using the command mvn archetype:generate -DgroupId=com.mycompany.rest.demo -DartifactId=stock-service-war -DarchetypeArtifactId=maven-archetype-webapp -DinteractiveMode=false 2.2 Open the pom.xml and add the following
<dependency> <groupId>org.springframework</groupId> <artifactId>spring-context</artifactId> <version>${spring.version}</version> </dependency> <!-- Contains the required class for writing Controller --> <dependency> <groupId>org.springframework</groupId> <artifactId>spring-web</artifactId> <version>${spring.version}</version> </dependency>
<!-- Contains the DispatcherServlet --> <dependency> <groupId>org.springframework</groupId> <artifactId>spring-webmvc</artifactId> <version>${spring.version}</version> </dependency>
<!-- The jars required for the Marshaller --> <dependency> <groupId>org.springframework</groupId> <artifactId>spring-oxm</artifactId> <version>${spring.version}</version> </dependency>
<!-- The Model jar which contains the classes for the XML schema --> <dependency> <groupId>com.mycompany.model.demo</groupId> <artifactId>stock-model-jar</artifactId> <version>1.0-SNAPSHOT</version> </dependency>
2.3 Switch to the directory stock-service-war and run "mvn clean install" followed by "mvn eclipse:eclipse"
2.4 Import the Project stock-service-war into Eclipse Workspace
2.5 If you have configured Web servers such as Apache Tomcat in your Eclipse just deploy the project and you could see the index.jsp rendered while invoking http://localhost:8080/stock-service-war/
2.6 Edit the web.xml and configure Spring MVC Servlet as follows
2.7 Create a file called "stockSDispatcher-servlet.xml" under the directory WEB-INF. The file name should be <Spring MVC Servlet name given in web.xml>-servlet.xml
2.8 Copy the following into stockSDispatcher-servlet.xml
Note the following classes are generated in the Step 1.7 <bean id="jaxb2marshaller" class="org.springframework.oxm.jaxb.Jaxb2Marshaller"> <property name="classesToBeBound"> <list> <value>com.mycompany.model.demo.oxm.StockRequest</value> <value>com.mycompany.model.demo.oxm.StockInfo</value> <value>com.mycompany.model.demo.oxm.StockResponse</value> </list> </property> </bean>
2.9 Create a folder java under src/main and add this as a Source Folder by going to "Java Build Path" settings
2.10 Create a package "com.mycompany.rest.demo.controller" and a class in it called "StockServiceController.java"
2.11 Add the following into the Controller class
/** * @param stockRequest The Request XML automatically converted into Object graph by framework * @return ModelAndView object which contains the Model to be marshalled by framework */ @RequestMapping(value = "/getStockInformation") public @ResponseBody StockResponse getStockInfo(@RequestBody StockRequest stockRequest) { //Log the Request logInputOutput(stockRequest, "REQUEST");
//Retrieve the response StockResponse stockResponse = getStockResponse(); //Log the Response data logInputOutput(stockResponse, "RESPONSE");
return stockResponse; }
/** * @return The StockResponse Object graph */ //This Response is retrieved from Service layer in Real time private StockResponse getStockResponse(){ StockResponse stockResponse = null; List<StockInfo> stockInfoList = null; StockInfo stockInfo = null;
stockResponse = new StockResponse(); stockInfoList = new ArrayList<StockInfo>(); stockInfo = new StockInfo(); stockInfo.setStockSymbol("AAPL"); stockInfo.setStockName("Apple Inc"); stockInfo.setHigh(112.7d); stockInfo.setLow(112); stockInfo.setClose(112); stockInfo.setVolume(14479600); stockInfo.setChangeInPrice(0.53); stockInfo.setChangeInPercentage(0.47); stockInfoList.add(stockInfo);
Testing:
1. Open the Poster plug-in (Tools->Poster or Ctrl+Alt+P), if installed already in Firefox
2. Paste the following URL in the URL field "http://localhost:8080/stock-service-war/stockService/getStockInformation"
3. Paste the following XML in the "Content to Send" Tab's Text Area
4. Type "application/xml" in the "Content Type" Text field
5. Click on "Post" button. In this case the input is XML and the Output is XML as well
6. The following is the XML Response
Getting the JSON Response:
1. Open the "Headers" Tab
2. Type "accept" in the Name field, application/json in the Value field and Click on "Add/Change" button
3. Now click on "Post" button
4. The following is the JSON response
Submitting JSON Request:
1. Paste the following JSON input in the "Content to Send" Tab's Text Area
{"stockSymbol":["AAPL","GOOG","IBM"]}
2. Change the Content Type to "application/json"
3. Click on "Post" button
4. The "accept" header's value determines the Response format. If it's set to "application/xml" the service returns XML, if set to "application/json" then the service returns a JSON response.