In this Article let us see how to develop a RESTful Web Service with Spring 3.x
Tools I used:
Eclipse 4.4 (Luna)
jdk1.7.0_45
apache-maven-3.2.1
apache-tomcat-7.0.47
The requirement:
Write a Restful Webservice which accepts a list of Stock symbols and return the following for each of them
1. Stock Name
2. High Price
3. Low Price
4. Closing Price
5. Volume
6. Change in Price
6. Change in Percentage
Step 1:
1.1 Create a Java Project using the Maven command given below. This is where we are going to define the XSDs for input and output of the Service. mvn archetype:generate -DgroupId=com.mycompany.model.demo -DartifactId=stock-model-jar -DarchetypeArtifactId=maven-archetype-quickstart -DinteractiveMode=false
1.2 Switch to the folder stock-model-jar and run "mvn clean install" followed by "mvn eclipse:eclipse"
1.3 Import the Project stock-model-jar into Eclipse Workspace
1.4 Create a folder called xsd under src/main
1.5 Create two XSDs viz stockRequest.xsd & stockResponse.xsd
1.6 Add the following in the pom.xml
1.7 Execute the commands "mvn clean install", this generates Annotated Jaxb classes. The generated classes could be found under <your-workspace>\stock-model-jar\target\generated-sources\jaxb\com\mycompany\model\demo\oxm. The classes also bundled in the jar file.
Step 2: Setting up the Spring MVC Web Application
2.1 Create a Maven Web application project called "stock-service-war" using the command mvn archetype:generate -DgroupId=com.mycompany.rest.demo -DartifactId=stock-service-war -DarchetypeArtifactId=maven-archetype-webapp -DinteractiveMode=false 2.2 Open the pom.xml and add the following
<dependency> <groupId>org.springframework</groupId> <artifactId>spring-context</artifactId> <version>${spring.version}</version> </dependency> <!-- Contains the required class for writing Controller --> <dependency> <groupId>org.springframework</groupId> <artifactId>spring-web</artifactId> <version>${spring.version}</version> </dependency>
<!-- Contains the DispatcherServlet --> <dependency> <groupId>org.springframework</groupId> <artifactId>spring-webmvc</artifactId> <version>${spring.version}</version> </dependency>
<!-- The jars required for the Marshaller --> <dependency> <groupId>org.springframework</groupId> <artifactId>spring-oxm</artifactId> <version>${spring.version}</version> </dependency>
<!-- The Model jar which contains the classes for the XML schema --> <dependency> <groupId>com.mycompany.model.demo</groupId> <artifactId>stock-model-jar</artifactId> <version>1.0-SNAPSHOT</version> </dependency>
2.3 Switch to the directory stock-service-war and run "mvn clean install" followed by "mvn eclipse:eclipse"
2.4 Import the Project stock-service-war into Eclipse Workspace
2.5 If you have configured Web servers such as Apache Tomcat in your Eclipse just deploy the project and you could see the index.jsp rendered while invoking http://localhost:8080/stock-service-war/
2.6 Edit the web.xml and configure Spring MVC Servlet as follows
2.7 Create a file called "stockSDispatcher-servlet.xml" under the directory WEB-INF. The file name should be <Spring MVC Servlet name given in web.xml>-servlet.xml
2.8 Copy the following into stockSDispatcher-servlet.xml
Note the following classes are generated in the Step 1.7 <bean id="jaxb2marshaller" class="org.springframework.oxm.jaxb.Jaxb2Marshaller"> <property name="classesToBeBound"> <list> <value>com.mycompany.model.demo.oxm.StockRequest</value> <value>com.mycompany.model.demo.oxm.StockInfo</value> <value>com.mycompany.model.demo.oxm.StockResponse</value> </list> </property> </bean>
2.9 Create a folder java under src/main and add this as a Source Folder by going to "Java Build Path" settings
2.10 Create a package "com.mycompany.rest.demo.controller" and a class in it called "StockServiceController.java"
2.11 Add the following into the Controller class
/** * @param stockRequest The Request XML automatically converted into Object graph by framework * @return ModelAndView object which contains the Model to be marshalled by framework */ @RequestMapping(value = "/getStockInformation") public @ResponseBody StockResponse getStockInfo(@RequestBody StockRequest stockRequest) { //Log the Request logInputOutput(stockRequest, "REQUEST");
//Retrieve the response StockResponse stockResponse = getStockResponse(); //Log the Response data logInputOutput(stockResponse, "RESPONSE");
return stockResponse; }
/** * @return The StockResponse Object graph */ //This Response is retrieved from Service layer in Real time private StockResponse getStockResponse(){ StockResponse stockResponse = null; List<StockInfo> stockInfoList = null; StockInfo stockInfo = null;
stockResponse = new StockResponse(); stockInfoList = new ArrayList<StockInfo>(); stockInfo = new StockInfo(); stockInfo.setStockSymbol("AAPL"); stockInfo.setStockName("Apple Inc"); stockInfo.setHigh(112.7d); stockInfo.setLow(112); stockInfo.setClose(112); stockInfo.setVolume(14479600); stockInfo.setChangeInPrice(0.53); stockInfo.setChangeInPercentage(0.47); stockInfoList.add(stockInfo);
Testing:
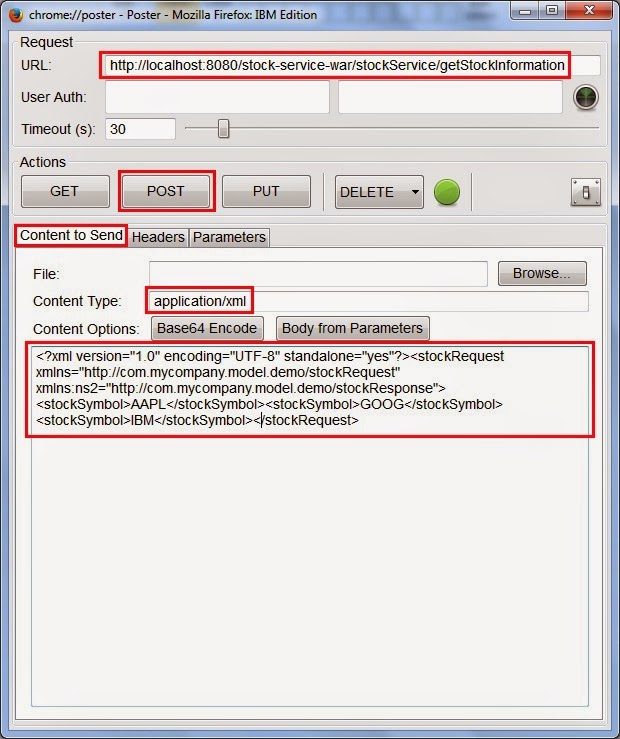
1. Open the Poster plug-in (Tools->Poster or Ctrl+Alt+P), if installed already in Firefox
2. Paste the following URL in the URL field "http://localhost:8080/stock-service-war/stockService/getStockInformation"
3. Paste the following XML in the "Content to Send" Tab's Text Area
4. Type "application/xml" in the "Content Type" Text field
5. Click on "Post" button. In this case the input is XML and the Output is XML as well
6. The following is the XML Response
Getting the JSON Response:
1. Open the "Headers" Tab
2. Type "accept" in the Name field, application/json in the Value field and Click on "Add/Change" button
3. Now click on "Post" button
4. The following is the JSON response
Submitting JSON Request:
1. Paste the following JSON input in the "Content to Send" Tab's Text Area
{"stockSymbol":["AAPL","GOOG","IBM"]}
2. Change the Content Type to "application/json"
3. Click on "Post" button
4. The "accept" header's value determines the Response format. If it's set to "application/xml" the service returns XML, if set to "application/json" then the service returns a JSON response.


No comments:
Post a Comment