Monday, August 5, 2024

Demystifying SSL Mutual Authentication

Two way SSL authentication 

In this post let's explore in detail how the two way SSL authentication works which is primarily used in application to application communication. 

To understand the secure communication between a Browser and Server read this post

Some basics:

Encryption: It's is the process of converting plain, readable data (plaintext) into an unreadable form (ciphertext) using an algorithm and a key.

Decryption: It's the process of converting encrypted data (ciphertext) back into its original, readable form (plaintext) using a decryption algorithm and a key.

Symmetric Key Encryption: In symmetric key encryption, there's only a single key and the same is used for both encryption and decryption.

Asymmetric Key Encryption: Also known as public-key encryption, asymmetric key encryption uses a pair of keys: a public key and a private key. The public key is used for encryption, while the private key is used for decryption. The data encrypted by a public key could only be decrypted by it's corresponding private key and vice versa.  

Certificate Authority (CA): A trusted entity that issues digital certificates used to verify the identity of individuals, organizations, or servers in a networked environment. E.g. Verisign

Certificate Signing Request: A Certificate Signing Request (CSR) is a message sent to a CA by applicant to get a Digital Certificate issued. The CSR contains information that will be included in the certificate, such as the applicant's public key, organization name, and domain name

Digial Certificate: CA issues a digital certificate containing the Entity's (applicant’s) public key and the CA’s signature

Keystore: A storage mechanism used to store and manage cryptographic keys and Certificates. E.g. JKS -Used in Java applications to store private keys and certificates.

Truststore: A truststore is a repository that contains a collection of trusted certificates. It is used to store and manage the certificates of external entities that are trusted by a system or application. These entities could be other servers, clients, or Certificate Authorities (CAs). The primary purpose of a truststore is to verify the identity of these external entities during secure communications

Setting up:

  • Generate a keypair each for both Server and Client using tools such as keytool or openssl
  • Generate Certificate Signing Request (CSR) for both Server and Client keys
  • Submit the CSR to a CA. Get it verified and a Digital Certificate issued
  • Install private keys of corresponding entities in its keystore. For example, server's private key gets installed in Server's keystore
  • Install the Digital Certificate issued by the CA in the corresponding entities keystore.
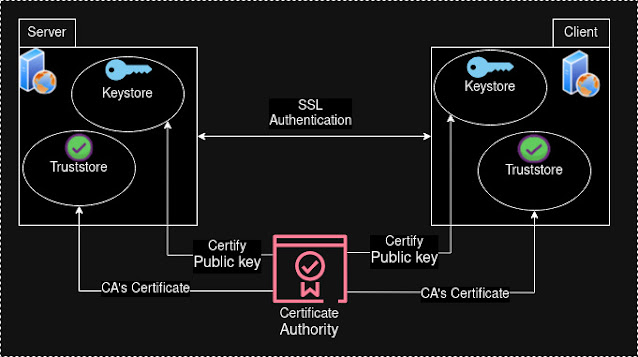
  • Install the CAs own Certificate in both the Server and Client's Truststore
The final setup will look as in the picture


How authentication works:

The authentication working mechanism is simplified for brevity. 
  • When establishing connection (authentication) both Server and Client exchanges its Digital Certificates. 
  • Both entities verifies if the other entity's Certificate is signed by (issued by) a CA which it trusts, meaning it has the corresponding CA's Certificate installed in it's Truststore
  • With the SSL/TLS handshake completed, both the client and server use the session keys generated during the key exchange to encrypt and decrypt the data transmitted between them, ensuring secure communication
Detailed Sequence of all steps:


Thursday, April 11, 2024

SSL/TLS communication between Browser and Server

SSL/TLS Communication Between Browser and Server Demystified

Have you ever wondered how a browser communicates securely with a server, safeguarding sensitive data from prying eyes? In this post let's demystify the process of establishing a secure communication channel using SSL certificates, now being called TLS. Let's keep things simple, avoiding overly technical jargon for easy understanding

SSL Certificate - for Server: An SSL certificate for a server comprises crucial elements: a private key, a public key, and identity information like the server's domain. During the establishment of a secure connection, the server presents its public key in the form of a certificate to the browser. However, for browsers to trust this certificate, the public key must be certified by an authorized Certificate Authority (CA)

Certificate Authority (CA): A Certificate Authority (CA) is a trusted entity responsible for signing public keys and issuing them in the form of digital certificates. The CA maintains a pair of private and public keys, with the private key kept securely confidential. When an entity requests certification, the CA uses its private key to sign the entity's public key. This process ensures that the digital certificate certifies the ownership of the public key by the named subject of the certificate. Before signing the public key, the CA conducts necessary verification to confirm the identity of the requesting subject

Process of obtaining a Server certificate and getting it certified by CA:

  1. Create a Key Pair: Generate a pair of cryptographic keys consisting of a private key and a corresponding public key. The private key remains confidential and is used for encryption and decryption, while the public key is shared openly for encryption
  2. Create a Certificate Signing Request (CSR): Generate a CSR file that includes the public key along with essential information about the entity, such as its domain name and organizational details
  3. Submit the CSR to a Trusted CA: Send the CSR to a trusted Certificate Authority for verification and certification. The CA will validate the information provided in the CSR and authenticate the entity's ownership of the domain
  4. CA Verification and Certificate Issuance: Upon receiving the CSR, the CA performs necessary verification procedures to ensure the authenticity of the entity. If the verification is successful, the CA signs (certifies) the public key and issues a digital certificate to the entity. This certificate contains the entity's identifying information, along with the CA's digital signature, confirming the certification of the public key
  5. Use of Certified Public Key: With the issued certificate, the entity now possesses a CA-certified public key, which can be used to establish secure communication with clients. The certificate provides assurance to clients that they are connecting to a legitimate and verified server


Once the CA signs the server's public key, both the private key and the CA-certified public key are installed in the server's keystore. The keystore is a repository that securely stores cryptographic keys and certificates for use in SSL/TLS communication.

Additionally, the CA issues its own certificate, which serves as identification for the CA. For a Browser to trust the Server, the CAs own certificate needs to be present in the Browser's truststore as well. The truststore is a repository of trusted certificates, including those of CAs, used by the browser to verify the authenticity of certificates presented by servers during SSL/TLS communication.

By installing the CA certificate in both the server's keystore and the browser's truststore, a secure chain of trust is established. This ensures that when the browser receives a certificate (Server's public key) from the server during SSL/TLS communication, it can verify the certificate's authenticity by checking if it is issued by one of the CAs whose CA certificate is present in its truststore

 How Browser establishes a secure connection with Server

  • Browser initiates a secure connection with the server
  • The server returns its certificate that contains the public key
  • The browser verifies whether the server's public key is signed by one of the CAs whose CA certificate is installed in its truststore
  • The browser also verifies that the server's domain matches the domain name in the certificate
  • If the verification is not successful, like the Server's public key was not signed by a CA whose Certificate is present in the Browser's Truststore or the Client's Certificate is expired then Browser throws a warning
  • If the verification is successful, the browser generates a pre-master secret, a random value
  • The browser sends the pre-master secret, cryptographic algorithms to be used, protocol version, etc., to the server. This information sent by browser is encrypted with the server's public key
  • Server decrypts the information sent by Browser using its private key
  • From the pre-master secret and additional information, both the server and the browser derives a session key
  • The session key is used to exchange data between the client and the server
  • The session key is a Symmetric key, ensuring secure communication


Friday, June 9, 2023

MySQL - Enable/Disable auto startup in Unix/Linux

MySQL - Enable/Disable auto startup in Unix/Linux

In this post let's see how to enable or disable auto startup of MySQL Database in Unix based machines

Environment: Fedora Linux v37

Dealing with MySQL

  • Starting MySQL: sudo service mysqld start or sudo systemctl start mysqld
  • Stopping MySQL: sudo service mysqld stop or sudo systemctl stop mysqld
  • Disable auto startup of MySQL Database at the time of system startup
    • Check the current auto startup status using the command sudo service mysqld status or sudo systemctl status mysqld
    • If already enabled for auto start then the result will be as follows
    • Now issue the command sudo systemctl disable mysqld to disable auto startup
    • One can verify now to make sure the auto startup is disabled using the command sudo service mysqld status or sudo systemctl status mysqld
    • Note: the systemctl commands are the modern way of starting/stopping services


Thursday, May 25, 2023

AWS DynamoDB Local Secondary Index (LSI) - Demystified

Local Secondary Index -  AWS DynamoDB - All you need to know

In a previous post we saw Global Secondary Index (GSI) in detail. In this post let's look into the Local Secondary Index (LS) in detail

Local Secondary Index (LSI):

A Local Secondary Index (LSI) uses the same Partition Key as that of the base Table with different Sort Key. It contains some or all of the attributes of the base Table. 

Sample Table: The following Table captures Goals scored, Number of Matches played by different Countries in FIFA World Cup Soccer during different games (2022, 2018 and so on)
Partition Key: Country
Sort Key: Game


From this Table one can easily query Number of Goals scored by a Country, given the Country name and the Game (e.g. France, FIFA-2022). Without Sort Key in the Query one can find the Goals scored by "France" across all Games they played, however if we want to find out in which Game they scored the most number of Goals the application needs to process the Query result to find out that.

Create a LSI named GoalsIndex

Let's see how a LSI makes such a querying easier, consider the below LSI where the "Partition Key" remains the "Country" however the Sort key is "Goals"
Partition Key: Country
Sort Key: Goals
Additional attribute projected: Matches


Points to remember:

  • The data in LSI is organized by the same Partition Key of the base Table, however with different Sort Key
  • The Partition Key in the LSI must be same as that of the base Table (in example table 'Country')
  • Must specify one non key attribute of base Table as the Sort Key for a LSI, it must be Scalar attribute (String, Number or Binary)
  • The Sort Key, if any, of the base Table is automatically Projected in to the LSI as non key attribute (in example 'Game')
  • The Partition Key of the base Table is automatically projected
  • A maximum of 5 LSIs can be created on a Table
  • A Query can also retrieve attributes that are not Projected to the LSI, DynamoDB retrieves these from the base Table known as 'fetches', however at greater Latency and high provisioned throughput cost
  • One can store up to 10 GB of data per distinct Partition Key value, this includes all the Items in the base Table as well as across all the LSIs
  • Unlike the base Table, the Partition Key and Sort Key combination need not be unique in a LSI

Projecting attributes:

Projection is set of attributes copied from base Table to the Secondary Index. Primary Keys (Partition & Sort keys) are always projected to the Index. The following are the 3 possible attribute Projection options for a LSI
  1. KEYS_ONLY: Projects Primary Key (Partition and Sort keys) attributes from the base Table to the LSI in addition to the Primary Key attributes defined in the LSI. In the sample LSI the base Table's Sort Key "Game" is projected besides its own Sort Key "Goals". This is the smallest possible LSI. The smaller the Index, the less it costs to store and also less the write costs
  2. INCLUDE: Includes specific attributes besides the automatically projected base Table's Primary Key attributes. In the example Index above the 'Matches' non key attribute of base Table is projected
  3. ALL: The LSI includes all the attributes of the base Table. The LSI will have the attributes "Country","Goals", "Game","Matches" and "Venue"

Reading data from GSI:

  • Query and Scan operations are supported GetItem and BatchGetItem are not supported in a LSI. This is the same as GSI
  • If there are multiple Items for a given Partition/Sort Key combination then all the Items that matches given Key are returned but not in a particular order
  • Data can be read from a LSI either "Strongly consistent" or "Eventually consistent" fashion. This can be specified using 'ConsistentRead'Query parameter
  • If the "ScanIndexForward" parameter is set to "false" while querying, the results are returned in the descending order of Sort Key attribute, in the example Index above the first record will be the highest Goals

Data synchronization between base Table and GSI:

  • DynamoDB keeps all the LSIs synchronized against its respective base Tables
  • Applications can't write directly into a LSI
  • Every time a new Item is added to the base Table the data type of the attribute, which is used as Sort Key in a LSI, should be respected. The sample index uses "Goals" as Sort Key, its value should always be of type Number while inserting into base Table
  • The Items in the LSI is not a one-to-one relationship in base Table. If a LSIs Sort Key attribute doesn't have a value in base Table then that Item is not copied to LSI. This rule can be made use of effectively to copy specific sub set of Items to a specific LSI

Read/Write capacity units for LSI:

  • Strongly consistent read consumes one Read Capacity Unit (RCU) while eventually consistent read consumes half of it
  • When query reads only Projected attributes, provisioned RCU usage is calculated based on the size of the Item in the Index (Keys and Projected attributes) and not based on the Item size in the base Table
  • The number of RCU used is the sum of all projected attributes sized across all returned items, this is rounded to the next 4 KB boundary
  • When query reads attributes which are not Projected into a LSI, the RCU is calculated based on the size of the Item in the LSI and also the entire Item size in the base Table, not just the attributes fetched from the base Table. Fetching from base Table causes additional latency
  • The maximum size of the results returned by Query is 1 MB, this includes the sum of size of all items returned matched in LSI and also in the base Table, if any attribute which is not projected is queried
  • When an Item is added, updated or deleted from base Table the corresponding change is replicated in LSI which incur additional Write cost
  • The Provisioned throughput cost is the sum of Write Capacity Units (WCU) consumed for writing to base Table and as well as to LSIs
  • When new Item is written to base Table which has a value for Sort Key attribute of a LSI or an existing Item is updated to populate with value for the same attribute which is previously undefined then WCU is consumed for writing that Item to the LSI
  • When value of Sort key attribute of an Item is changed from X to Y in base Table, it result in one Delete and one Write in a LSI
  • When update on an Item in the base Table removes the Sort key attribute of a LSI a write is consumed to get the Item deleted from the LSI
  • When an Item is written to the base Table, the DynamoDB automatically copies the correct subset of attributes to LSIs. Storage cost is charged on this Item storage for both base Table and LSIs

Items Collections:

  • Item collection is group of Items that have the same Partition key value in base Table and any LSI. In the example Table it's 'Country'. 
  • Following operations can be performed on an Item collection that returns information about the Item collection. When 'ReturnItemCollectionMetrics' parameter is set to SIZE each of these operations return details of size of Items in Collection in Index
    • BatchWriteItem
    • DeleteItem
    • PutItem
    • UpdateItem
    • TransactWriteItems
  • The maximum size of any item collection for a table which has one or more local secondary indexes is 10 GB
  • If an item collection exceeds the 10 GB limit, DynamoDB returns an ItemCollectionSizeLimitExceededException, and you won't be able to add more items to the item collection or increase the sizes of items that are in the item collection
  • If the application expect the size of Item collection to exceed 10 GB then one should consider creating a GSI
  • Each Item collection is stored in a single partition whose size capability is 10 GB. One should choose Partition Key in such a way the data is evenly distributed across Partitions. For a Table with LSIs, applications should not create hot spots of read/write activity within a single Item collection which is in a single Partition

Monday, May 15, 2023

AWS DynamoDB Global Secondary Index (GSI) - Demystified

Global Secondary Index (GSI) - AWS DynamoDB - All you need to know

In this post let's see in detail what's GSI, how it's useful etc. Read through this completely before designing a GSI

GSI:

A Global Secondary Index (GSI), simply Index, is created on a Table to facilitate querying data using non key attributes of the Table which would in general result in full Scan. A GSI contains a selection of attributes from the base table, but they are organized by a Primary key (Partition Key, Sort Key) that is different from that of the base table. 

Sample Table: Consider this Table which captures Scores of Student's in different Subjects. From the main table it's easy to query all the Subject's score given a "Student_Id"

Partition Key: Student_Id

Sort Key: None

From the above Table if we want to query who scored the top in a particular Subject it's not possible without scanning the whole Table. We can create the following GSI to make the querying possible without full scan.

Name of GSI: TopScoreIndex

Partition Key: Subject

Sort Key: Score 


Important points to remember:

  • The GSI's key does not need to have any of the key attributes from the base table. It doesn't even need to have the same key schema as the table. In the example above the base Table's Partition key is "Student_Id" and there's no Sort Key while the GSI's Partition Key is "Subject" and it has a Sort Key "Score"
  • The base Tables's Primary key attributes are always projected in the GSI. In the above GSI the "Student_Id" is automatically projected. Other attributes can be projected as needed. Any attribute which is not projected can't be retrieved from the Index while querying, example the 'University' attribute
  • If the "ScanIndexForward" parameter is set to "false" while querying, the results are returned in the descending order, the highest score will be returned at the first place
  • The "Partition Key" is mandatory in the GSI, the Sort Key is optional which is the case for the base table as well
  • The base Table can have a simple Primary Key (Partition Key alone), the GSI can have a Composite Primary Key (both Partition Key and Sort Key) or vice versa
  • The Index Key attributes should be of any Top-level attributes such as 'String', 'Number' or 'Binary' from the base Table
  • In base table the Primary Key values must be unique, that's not the case in the Index. In the example Index above there are two items with the same "Subject" and "Score" which is "DS&A" Subject with the Score of "92"
  • While querying the Index all the items that matches the Key Attributes are returned, however there's no specific order within the returned Items
  • GSI tracks only the items where value exists for the GSIs Primary Ket attributes in the base Table. In the base Table if one of the GSI Primary Key attributes "Subject" or "Score" doesn't have a value then that Item is not populated in the GSI. That means the Item for "Student_Id" 200 doesn't have value for the "Score" attribute hence that Item will not appear in GSI. This can be exploited to create GSIs which has only subset of interested Items from the base Table.

Projecting attributes:

The following are the 3 possible attribute Projection options for a GSI
  1. KEYS_ONLY: Projects Primary Key attributes from the base Table to the GSI in addition to the Primary Key attributes defined in the GSI. In the sample GSI the base Table's Primary Key "Student_Id" is projected besides its own Primary Key "Subject" and "Score". This is the smallest possible GSI
  2. INCLUDE: Includes specific attributes besides the automatically projected base Table's Primary Key attributes. If needed we can include the "University" attributes in the GSI
  3. ALL: The GSI includes all the attributes of the base Table. This is the largest possible GSI. The GSI will have the attributes "Subject", "Score", "Student_Id", "University" and "Gold_Medal"

Note an projecting attributes:

  1. While considering attributes to project in a GSI one need to keep in mind the associated provisioned throughput and storage costs. Writing to GSI is additional cost besides writing to the base Table and the same applicable for the Storage
  2. Project only the necessary attributes to ensure the GSI is small so that the storage and write costs are the lowest

Reading data from GSI:

  • Query and Scan operations are supported GetItem and BatchGetItem are not supported in a GSI

Data synchronization between base Table and GSI:

  • When Write/Delete happens on the base Table the changes are asynchronously reflected in the GSI in an eventually consistent fashion. While the synchronization takes fraction of a second it's possible the data is not synchronized in an unlikely scenario the application should keep this in mind
  • No direct write on GSI
  • GSI's Key attributes are defined at the time of GSI creation. When new Items are written to the base Table the attributes data type should be the same otherwise 'ValidationException" is thrown. In the sample GSI above the data types of GSI primary key attributes are "String" and "Number" respectively for the attributes "Subject" and "Score". All write in the base table should conforms to this data type

Read/Write capacity units for GSI:

Every point in this section is so important to understand how Provisioned Throughput works with GSI
  • For a GSI created on a Provisioned throughput mode base Table, the Read/Write capacity units must be also specified. This throughput settings are separate from the base Table.
  • A Query on the GSI utilizes the Rad capacity unit of the GSI and not the base Table
  • When an Item is Written/Updated/Deleted on the base Table the changes are also propagated to the GSIs which consumes the Write Capacity of the GSI
  • GSIs support eventually consistent read which consume half of the read capacity unit. Per read capacity unit 8 KB of data can be retrieved (i.e. 2x4KB)
  • For GSI queries the read capacity unit consumption is calculated based on the Index size which depends on the projected attributes and not based on item size on the base Table
  •  The maximum size of results returned by Query is 1 MB
  • When Insert/Update/Delete on a Table affects the GSI the provisioned throughput cost consists of Write Capacity Unit (WCU) consumed for writing to the base Table and also to all the GSI
  • Write to base Table doesn't affect any GSI then no write capacity is consumed for GSI
  • Write to succeed there should have been enough write capacity provisioned in base Table and in all GSIs, otherwise the write will be throttled
  • When a new Item is written to the base Table that qualifies to be propagated to an Index or an existing Item is being updated in base Table (adding an attribute) that makes it to be replicated to the Index then write capacity is consumed for GSI
  • When GSI key attribute's value changed in the base Table it results in two writes in GSI, one for Delete and one for Insert
  • When an attribute that is projected in an Index is deleted in an Item in the base Table then a write is required in the GSI to Delete that Item

Thursday, December 31, 2020

JavaScript - Understanding well


Let's understand JavaScript well

  • Avoid 'var' to declare variable
What's the output?
1:  var a = "X";  
2:  console.log(a+" - "+b);  
3:  var b = "Y";  
Explanation:
Do you expect the output to be "X - Y"? or an error be thrown? both are wrong.
The output is "X - undefined"
Here's the reason: JavaScript hoisting occurs during the creation phase of the execution context that moves the variable and function declarations to the top of the script. Even though the variable 'b' is declared and initialized with a value "Y" at line # 3, the declaration gets moved to the top of the script with a value undefined.
1:  bar();  
2:  //foo();//ReferenceError: Cannot access 'foo' before initialization   
3:  let foo = () => {  
4:    console.log('hello from foo');  
5:  }  
6:  function bar() {  
7:    console.log('hello from bar');  
8:  }  
Similarly in the above code the function 'bar' is accessible even before it's defined due to hoisting which makes the code difficult to follow as a function is used before it's defined. On the other hand the function 'foo' is not accessible before it's defined as it's created using 'let'. Use only let or const to declare variables and functions

  • Closure
A closure is the combination of a function and the lexical environment within which that function was declared. This environment consists of any local variables that were in-scope at the time the closure was created.
Let's understand this with an example
1:  let simpleFactory = () => {  
2:    return () => {console.log('log from function returned by simpleFactory'); }  
3:  }  
4:  let simpleFun = simpleFactory();  
5:  simpleFun();//log from function returned by simpleFactory  
On line# 1 we define a Factory function which returns a function that simply prints a message on the console. 
Lin# 4 we got the returned function stored in a variable 'simpleFun'. 
Line# 5 we invoke the function stored in the variable 'simpleFun' which prints the log message. 
Simple to understand, right? Let's see another example

1:  let parameterizedFactory = (x) => {  
2:    return (y) => {return x*y;}  
3:  }  
4:  let parameterizedFun = parameterizedFactory(5);  
5:  console.log(parameterizedFun(2));//prints 10  
6:  console.log(parameterizedFun(3));//prints 15  
Now we are adding a little complexity to the Factory function by parameterizing it. The factory now accepts a value in parameter x and that value is used inside the function returned by the factory in line#2. 
We call parameterizedFactory by passing a value '5' which gets assigned in 'x'
The function returned in line# 2 uses the variable 'x' inside its body which is possible because when the function (at line# 2) is created an environment is created for that function which includes all the in-scoped local variables, that's 'x' in this case.
The function got stored in 'parameterizedFun' at line# 4 has access to the variable 'x' with value '5' due to Closure.

The local variable doesn't need stay constant, it can be even modified.
Let's see an example:
1:  let factoryWithLocVar = () => {  
2:    let count = 0;  
3:    return (y) => {count++; return count + y; }  
4:  }  
5:  let funWithLocVar = factoryWithLocVar();  
6:  console.log(funWithLocVar(2));//prints 3  
7:  console.log(funWithLocVar(5));//prints 7  
The function returned in line# 3 refers to a local variable count and even it modifies it during each invocation. The local variable 'count' is modified during each invocation and the modification reflects in subsequent calls to that function.

  • Pure function
A pure function in programming is a function that always produces the same output for the same set of input values and has no side effects. It means it should not change any state or data

Example:
1:  let add = (a,b) => {  
2:    return a+b;  
3:  }  
The above function would return the same result how many ever times it's called with the same input, and it doesn't modify state of any variables. In contrast an impure function may not return the same value in subsequent invocations for the same input also it could modify the state of a global variable (in the example given below it's the sum variable). 

Let's see an example:
1: let sum = 0;

2:  let add = (a,b) => {  
3:    sum += a+b;
4:    return sum;
5: }

More to follow ......

Sunday, December 20, 2020

AWS - Lambda Blue/Green deployment

AWS - Zero downtime Blue/Green deployment for Lambda

If your application is based on Lambda, the Lambda's can be updated in Production with zero downtime using Lambda Versioning and Alias. The Lambda's can be rolled back too easily if something is wrong with the latest code with zero downtime.

Let's see in detail

Understanding some keywords

  • Versions - Lambda creates a new version of your function each time that you publish the function. The versioned Lambda's code is frozen and not editable. The version is automatically named 1, 2, 3 and so on each time published and one can't name a version differently
  • Aliases - A Lambda alias is like a pointer to a specific Lambda version. Users can invoke the Lambda version using the alias. The Alias can be updated to point to different version
  • Blue version - Existing version of Lambda being currently used in Production (In Diagram 2 v2)
  • Green version - New version of Lambda being deployed to Production
Keep in mind, Lambda can be invoked in three ways
  1. Just using its name (e.g. BonusCalculatorLambda). In this case the $LATEST version of the Lambda is invoked by default
  2. Using its Version (e.g. BonusCalculatorLambda:1). In this case the version 1 of the Lambda is invoked
  3. Using its Alias (e.g. BonusCalculatorLambda:PROD). In this case the version of the Lambda currently being pointed by the Alias is invoked (As per the Diagram 2 below version 2)
Let's assume your application is built using Spring Boot or Node.js Express and uses multiple Lambdas to implement its business logic and invokes them using AWS SDK as depicted in the following picture. The gateway application is running on ECS Cluster which is exposed to Clients via an ALB. Each of the Lambda can be updated in Production with zero downtime.

Diagram 1 - Lambda based application


How do we update each Lambda with zero down time and rollback in case something is not good?

Diagram 2 - Before Production deployment state


The above diagram depicts the current state of the Application before deployment for a single Lambda. The Lambda is accessible via an Alias (called PROD) which is now pointing to Version 2 of Lambda (BLUE version). At this point we have the following versions of Lambda v1, v2 and $LATEST.

Here's how to update the Lambda with zero downtime, the same approach needs to be replicated for each Lambda. 
Follow these steps to update the Lambda with changes, refer to Diagram 3 below
  1. Update the Lambda code using a Jenkins job in Production, this would update the $LATEST version of the Lambda, this is the only version which is open for update, rest of the versions (v1, v2) are frozen and can't be modified
  2. Test the updated Lambda using a Test User, the Application would invoke $LATEST version of the Lambda based on some criteria such as logged in User (Test User) etc. For real User the Application invokes Lambda using the PROD Alias (e.g. BonusCalculatorLambda:PROD) which would still continue to invoke v2 (Blue) version of the Lambda. Here's a sample Node.js Lambda client
  3. Once the Test results of $LATEST versions is satisfactory, invoke publish Jenkins job. This would publish v3 of the Lambda. Refer to Diagram 3 below
  4. As a last step run a Jenkins job to update the Alias PROD so that it starts pointing to v3 (Green) version of Lambda
  5. In case the deployment needs to be rolled back, just invoke Alias update Jenkins job on the last Pipeline # so that it points back to previous BLUE version v2
During any of this process the Production users are not impacted and the Service is up all time. Replicate this same process for all your Lambdas

Diagram 3 - After deployment of new version in Production


Here's AWS CLI commands to do all of the things said above, the Lambda is implemented using Node.js:
  • Create index.js file with the following line of code
 exports.handler = async (event) => {  
   const response = {  
     statusCode: 200,  
     body: JSON.stringify('Hello from Lambda!'),  
   };  
   return response;  
 };  

  • Create a zip file to deploy this code as a Lambda (no .zip extension is necessary, it gets added)
 zip BonusCalculatorLambda index.js

  • Create the Lambda, make sure you are running this command from the folder where you have BonusCalculatorLambda.zip This creates the $LATEST version of the Lambda
 aws lambda create-function --function-name BonusCalculatorLambda \
--role arn:aws:iam::123903503456:role/service-role/roleLambdaExecution \ --runtime nodejs12.x \ --handler index.handler \ --zip-file "fileb://BonusCalculatorLambda.zip
"

  • Publish the Lambda to create a version, after this command there would be two version of Lambda 1 and $LATEST, only $LATEST is editable and version 1 is frozen
 aws lambda publish-version --function-name BonusCalculatorLambda --description v1  

  • Create an Alias
 aws lambda create-alias --function-name BonusCalculatorLambda \
      --name PROD \
      --function-version 1

  • Update Lambda code, this updates $LATEST version
 aws lambda update-function-code --function-name BonusCalculatorLambda \
      --zip-file "fileb://BonusCalculatorLambda.zip"

  • Upon creating new version 2, update the Alias to point to new version
 aws lambda update-alias --function-name BonusCalculatorLambda \
      --name PROD --function-version 2

Prerequisite to execute these commands
  • One should have setup Client Credentials, see here for instructions
  • The Lambda needs a role to Execute (in the example roleLambdaExecution) this should have been created already
  • The Client credential one has setup for CLI should have the following Policy action
 {  
   "Version": "2012-10-17",  
   "Statement": [  
     {  
       "Sid": "VisualEditor",  
       "Effect": "Allow",  
       "Action": "iam:PassRole",  
       "Resource": "arn:aws:iam::123903503456:role/service-role/roleLambdaExecution"  
} ] }

Note: For the Blue/Green zero downtime deployment it's not necessary your Lambda's should have been exposed via an application (Spring Boot or Node.js Express). It's a sample Architecture explained in this article. The Lambda can be exposed directly via an ALB or API Gateway and the same approach can be used to deploy changes with zero downtime with slight modifications.